How to Add a WooCommerce Cart Icon to Menu Bar

Adding a cart icon to your WooCommerce website’s menu bar is a simple yet effective way to enhance the shopping experience for your customers. It provides a clear visual indicator of the cart’s contents, allowing users to quickly check how many items they’ve added and the total amount without needing to navigate to a separate page.
This small addition can significantly improve navigation, reduce friction in the shopping process, and ultimately lead to increase conversion rates. In this article, we’ll guide you through two easy methods to add a cart icon to your website’s menu bar.
2 Methods to Add a WooCommerce Cart Icon
In this two methods will not only display the cart icon but also show the number of items in the cart and the total cart amount. Whether you prefer custom coding or using a shortcode, we’ll make the process simple and easy to follow.
Method 1: Using custom code in the header.php file
If you’re comfortable editing your theme files, this method provides a highly customizable solution. In this easy four steps guide, we will look how to add a WooCommerce cart icon to the menu bar using custom code in the header.php file.
This icon will link to the cart page and display the current item count in the cart. For this example, we’ll use Advanced Custom Fields (ACF) Pro to create and manage the header section. Follow these steps to add the cart icon:
1. Create an ACF Field for the Header Section
Add the following code to your functions.php file to create an option page in ACF:
if( function_exists('acf_add_options_page') ) {
    acf_add_options_page(array(
        'page_title'    => 'Header Footer',
        'menu_title'    => 'Header Footer',
        'menu_slug'     => 'theme-general-settings',
        'capability'    => 'edit_posts',
        'redirect'      => false
    ));
}
Once added, you’ll see a “Header Footer” option page in your WordPress dashboard.
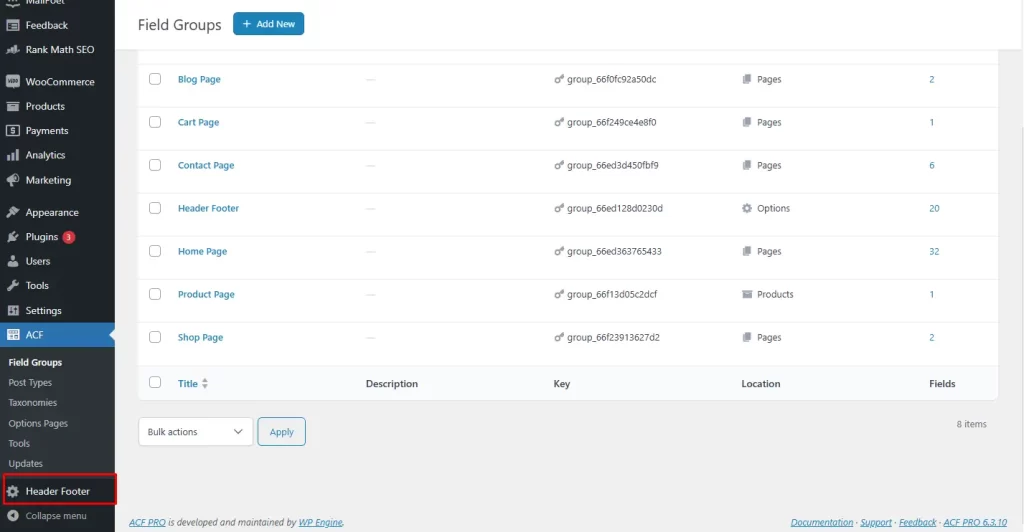
2. Add New Fields Group
Go to the ACF settings, add a new field group, and name it “Header Footer.”
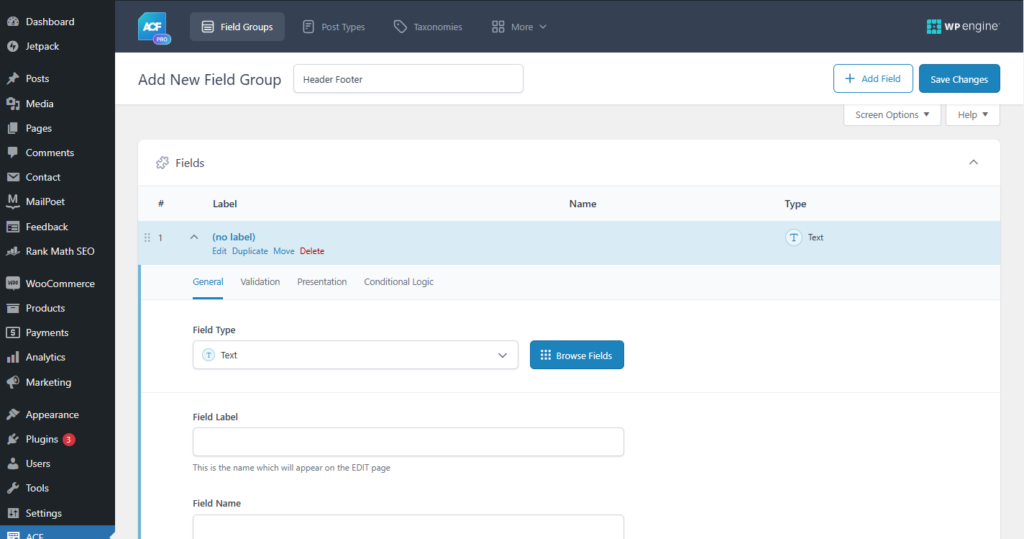
3. Add the Following Fields to the Group
- Header Logo – Image
- Header Social Share – Repeater
- Header Social Icon – Image
- Header Social Hover Icon – Image
- Header Social Icon URL – Text
- Header Cart Icon – Image
- Header Cart URL – Text
4. Add Code to the header.php File
Insert the following code in your header.php file to render the header, including the WooCommerce cart icon:
<header id="masthead" class="<?php echo esc_attr( $wrapper_classes ); ?>">
    <div class="header-main">
        <div class="wrap">
            <div class="header-sec">
                <div class="header-logo">
                    <?php if(!empty(get_field("header_logo","option"))){ ?>
                        <a href="<?php echo site_url(); ?>"><img src="<?php echo get_field("header_logo","option"); ?>" alt="site-logo"/> </a>
                    <?php } else { ?>
                        <a href="<?php echo site_url(); ?>"> <?php echo get_bloginfo( 'name' ); ?> </a>
                    <?php } ?>
                </div>
                <div class="header-menu-sec">
                    <div class="header-menu">
                        <?php get_template_part( 'template-parts/header/site-nav' ); ?>
                    </div>
                    <div class="header-contact">
                        <ul class="header-social">
                            <?php if( have_rows('header_social_share','option') ):?>
                                <?php while( have_rows('header_social_share','option') ): the_row();
                                $header_social_icon = get_sub_field('header_social_icon','option');
                                $header_social_hover_icon = get_sub_field('header_social_hover_icon','option');
                                $header_social_icon_url = get_sub_field('header_social_icon_url','option');
                            ?>
                                <li class="header-social-img"><a target="_blank" href="<?php echo $header_social_icon_url; ?>"><img class="social-icon" src="<?php echo $header_social_icon; ?>" alt="Social-icon"><img class="social-hover-icon" src="<?php echo $header_social_hover_icon; ?>" alt="Social-hover-icon"></a></li>
                                <?php endwhile; ?>
                            <?php endif; ?>
                        </ul>
                    </div>
                    <div class="header-cart">
                        <a href="<?php echo get_field("header_cart_url","option"); ?>"><img src="<?php echo get_field("header_cart_icon","option"); ?>" alt="cart-icon"><span><?php echo WC()->cart->get_cart_contents_count(); ?></span></a>
                    </div>
<?php echo WC()->cart->get_cart_subtotal(); ?>
                </div>
            </div>
        </div>
    </div>
</header>
5. Style the Header
Add the following CSS to your style.css file to style the header and cart icon as designed:
.site-header{width: 100%;  transition: all 0.8s ease-in-out; animation-duration: 1s; animation-fill-mode: both; padding: 40px 50px;}

.sticky-active {position: sticky; top: 0; background-color: #121517; z-index: 99; animation-name: slideInDown; padding-top: 20px; padding-bottom: 20px;}

@keyframes slideInDown{

    0%{
        transform:translate3d(0,-100%,0);visibility:visible
    }
    100%{
        transform:translate3d(0,0,0);
    }
}

.header-logo {transition: all 0.4s ease;}

.sticky-active .header-logo {width: 180px;}

.header-main .wrap {max-width: 100% !important;  padding: 0;}

.header-sec {display: flex;   justify-content: space-between;   align-items: center;}

.header-logo a {display: inline-block;}

.header-menu-sec {display: flex;   align-items: center;   grid-gap: 40px;}

.header-menu ul li{margin:0 20px !important;}

.header-menu ul li a {color: var(--white-color);  font-size: 16px; text-transform: capitalize; transition: all 0.4s ease; font-weight: 400 !important; padding: 10px 0 !important; position: relative;}

.header-menu ul li a:hover , .header-menu ul li.current-menu-item a{color: var(--pastel-green);}

.header-menu ul li.current-menu-item a::before, .header-menu ul li a:hover::before{content: ''; position: absolute; top:110%; left: 50%; transform: translateX(-50%); width: 7px;   height: 7px; border-radius: 100%;

background-color: var(--pastel-green); transition: all 0.4s ease;}

.header-menu ul li a::before{opacity: 0;}

.header-menu ul li a:hover:before , .header-menu ul li.current-menu-item a::before{opacity: 1;}

.header-social {display: flex;  grid-gap: 14px;  align-items: center; margin-bottom: 0;}

.header-social li {opacity: 1;   transition: all 0.4s ease;}

.header-social li a .social-hover-icon {position: absolute;  left: 0px;   opacity: 0;   transition: all 0.4s ease;}

.header-social li a {position: relative;    transition: all 0.4s ease;  display: flex; align-items: center;}

.header-social li a:hover .social-hover-icon {opacity: 1;}
.header-social li a  .social-icon {opacity: 1;}
.header-social li a:hover  .social-icon {opacity: 0;}
.header-social li img {height: 16px; transition: all 0.4s ease;}
.header-cart {position: relative;}

.header-cart span {position: absolute; top: 0px; transition: all 0.4s ease; right: -5px; background-color: var(--lemon-thyme); width: 15px; height: 16px; border-radius: 100%; display: flex; align-items: center;
justify-content: center; font-size: 9px;}
.header-cart a:hover span {background-color: var(--pastel-green);}
After saving your changes, you’ll see the cart icon on your header with an item count & total cart amount. Initially, the count will display “0” if no products are in the cart. Adding items to the cart will automatically update the count.
Method 2: Adding a cart icon with a WooCommerce shortcode.
For users unfamiliar with custom coding, this method leverages WooCommerce’s built-in shortcode functionality.
1. Add a Shortcode for the WooCommerce cart button
First, we create a shortcode [woocommerce_cart_button] to display the cart icon with the current item count.
<?php

add_shortcode ('woocommerce_cart_button', 'woocommerce_cart_button' );
function woocommerce_cart_button() {
    ob_start();
    $cart_count = WC()->cart->cart_contents_count;
    $cart_url = wc_get_cart_url();
    if ( $cart_count < 1 ) {

        $hide_btn = 'hide_woo_cart_button';
    }else{
        $hide_btn = '';
    } ?>

    <a class="menu-item cart-contents <?php echo $hide_btn; ?>" href="<?php echo $cart_url; ?>" title="Basket">

        <svg xmlns="http://www.w3.org/2000/svg" width="24" height="24" viewBox="0 0 24 24"><path d="M10 19.5c0 .829-.672 1.5-1.5 1.5s-1.5-.671-1.5-1.5c0-.828.672-1.5 1.5-1.5s1.5.672 1.5 1.5zm3.5-1.5c-.828 0-1.5.671-1.5 1.5s.672 1.5 1.5 1.5 1.5-.671 1.5-1.5c0-.828-.672-1.5-1.5-1.5zm1.336-5l1.977-7h-16.813l2.938 7h11.898zm4.969-10l-3.432 12h-12.597l.839 2h13.239l3.474-12h1.929l.743-2h-4.195z"/></svg>

        <?php
        if ( $cart_count > 0 ) {?>
            <span class="cart-contents-count"><?php echo $cart_count; ?></span>
        <?php } ?>

</a>
<?php echo WC()->cart->get_cart_subtotal(); ?>
    <?php return ob_get_clean();
}
add_filter( 'woocommerce_add_to_cart_fragments', 'woo_cart_but_count' );
?>
2. Add a Filter to Enable AJAX for Cart Count Updates
This filter ensures the cart count updates automatically when items are added or removed.
<?php
add_filter( 'woocommerce_add_to_cart_fragments', 'woocommerce_cart_button_count' );
function woocommerce_cart_button_count( $fragments ) {

    ob_start();
    $cart_count = WC()->cart->cart_contents_count;
    $cart_url = wc_get_cart_url();
    if ( $cart_count < 1 ) {
        $hide_btn = 'hide_woo_cart_button';
    }else{
        $hide_btn = '';
    } ?>
    <a class="cart-contents menu-item <?php echo $hide_btn; ?>" href="<?php echo $cart_url; ?>" title="<?php _e( 'View your shopping cart' ); ?>">

        <svg xmlns="http://www.w3.org/2000/svg" width="24" height="24" viewBox="0 0 24 24"><path d="M10 19.5c0 .829-.672 1.5-1.5 1.5s-1.5-.671-1.5-1.5c0-.828.672-1.5 1.5-1.5s1.5.672 1.5 1.5zm3.5-1.5c-.828 0-1.5.671-1.5 1.5s.672 1.5 1.5 1.5 1.5-.671 1.5-1.5c0-.828-.672-1.5-1.5-1.5zm1.336-5l1.977-7h-16.813l2.938 7h11.898zm4.969-10l-3.432 12h-12.597l.839 2h13.239l3.474-12h1.929l.743-2h-4.195z"/></svg>
        <?php if ( $cart_count > 0 ) { ?>
            <span class="cart-contents-count"><?php echo $cart_count; ?></span>
        <?php } ?>
</a>
<?php echo WC()->cart->get_cart_subtotal(); ?>
    <?php
    $fragments['a.cart-contents'] = ob_get_clean();
    return $fragments;
}
?>
3. Add CSS Styling for the Cart Button
Add the following CSS to your style.css file to style the cart icon:
<style id="woo-cart-button-css">
        a.cart-contents {position: relative; display: flex !important; flex-flow: column nowrap; justify-content: center;}
        .cart-contents:hover {text-decoration: none;}
        .cart-contents-count {position: absolute; top: 5px; right: 7px; transform: translateY(-105%) translateX(25%); font-family: Arial, Helvetica, sans-serif; font-weight: normal; font-size: 12px; line-height: 22px; height: 22px; width: 22px; vertical-align: middle; text-align: center; color: #fff; background: #000; border-radius: 50%; padding: 1px;}
    </style>
Conclusion
By following these methods, you can seamlessly add a WooCommerce cart icon with item count and total cart amount to your website’s menu bar. Whether you prefer customizing theme files or using shortcodes, these steps ensure a professional and functional result.
If you encounter any errors or need technical assistance while adding the cart icon using these steps, our experienced WordPress developers are here to help. Whether it’s adding a cart icon or implementing other custom functionalities, we’re just a message away.
I am working as a WordPress & Squarespace Developer at Samarpan Infotech, My expertise encompasses a wide range of skills, theme customization, plugin integration, API Integration. I strongly believe in the motto, "Success is not the key to happiness, happiness is the key to success; if you love what you are doing, you will be successful.