Shopify Metafields and Metaobjects Explained: How to Create and Setup

Shopify’s Metafields and Metaobjects are powerful tools that enable store owners and developers to enhance and customize their online stores. They help store owners add dynamic, unique, and personalized content to products, collections, and more. In this comprehensive guide, we’ll explore what these features are, their key differences, and how to use them effectively.
What are Shopify Metafields?
Metafields are custom fields in Shopify that allow you to store extra information about your store’s resources, such as products, orders, collections, and customers. They extend the default functionality, enabling you to add details like size guides, technical specifications, or custom messages.
Common Uses of Metafields
- Product Customization: Add unique fields for product materials, dimensions, or user manuals.
- Collection Enhancements: Include custom banners or promotional messages for specific collections.
- SEO Optimization: Store custom meta tags or structured data for search engines.
- Order Management: Add notes or custom statuses to orders for better tracking.
What are Shopify Metaobjects?
Metaobjects are reusable, structured data objects introduced to complement metafields. Unlike metafields, which are tied to specific resources, metaobjects allow you to create global data structures that can be used across your store.
Why Use Metaobjects?
- Reusable Data: Ideal for data that applies to multiple products or collections, such as brand information or care instructions.
- Centralized Management: Update data in one place and reflect changes across the store.
- Dynamic Content: Easily integrate metaobjects into themes to display complex data.
How to Use Metafields and Metaobjects
1. Setting Up Metafields
In Shopify Admin:
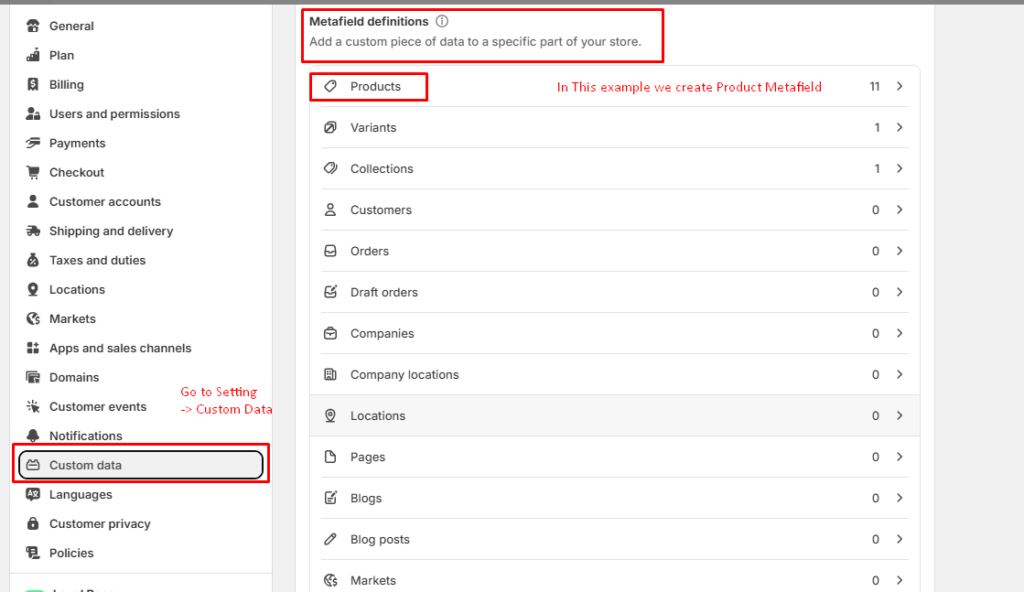
- Go to Settings > Custom Data.
- Select the resource (e.g., Products, Collections).
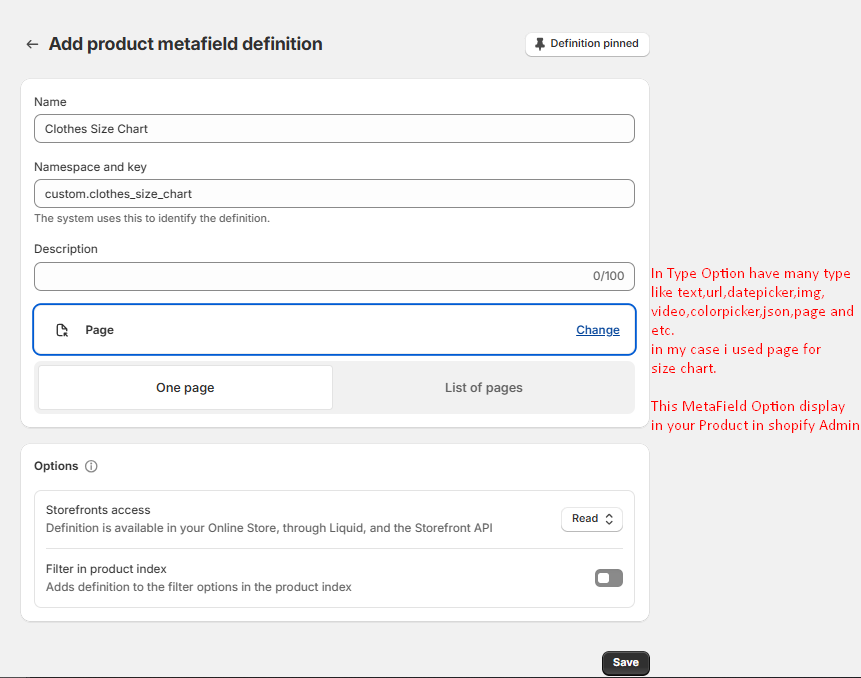
- Click Add Definition, set a namespace and key, and choose a data type (text, URL, number,img,video,json etc.).
- Save the Metafield and populate values in your products or collections.
In Liquid Code:
To display a Metafield on your theme, use:
Liquid Syntax:
{{ product.metafields.namespace.key }} Example: Liquid
<p>Material: {{ product.metafields.custom.material }}</p> How to Create MetaField in Shopify (8 Steps)
Here are 8 simple steps to create shopify metafield
- Go to Setting and Click on Custom Data.
- Type of Meta Field you can see below in this example we learn Product Metafield.
- After this Create New Add Definition MetaField.
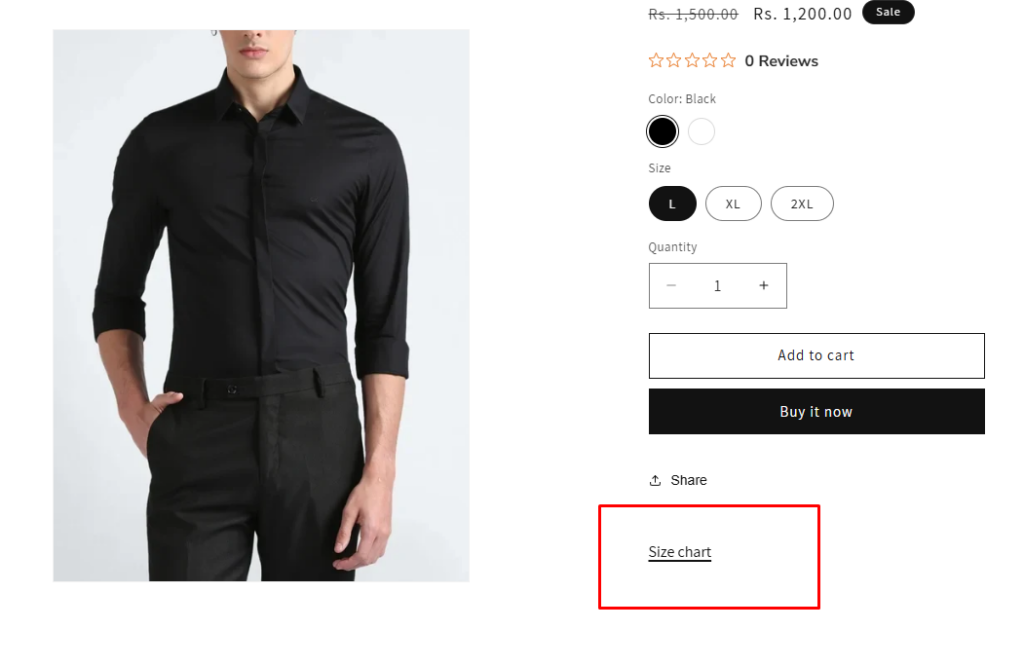
Example: In this case, we used Metafield for men and women clothes size chart. But you can use for many like Metafield types like datepicker, colorpicker, Img, video, dynamic Url.
Step 4: In below screenshot you can see, we created product Metafield for my example. You can create for pages or blog Metafield.
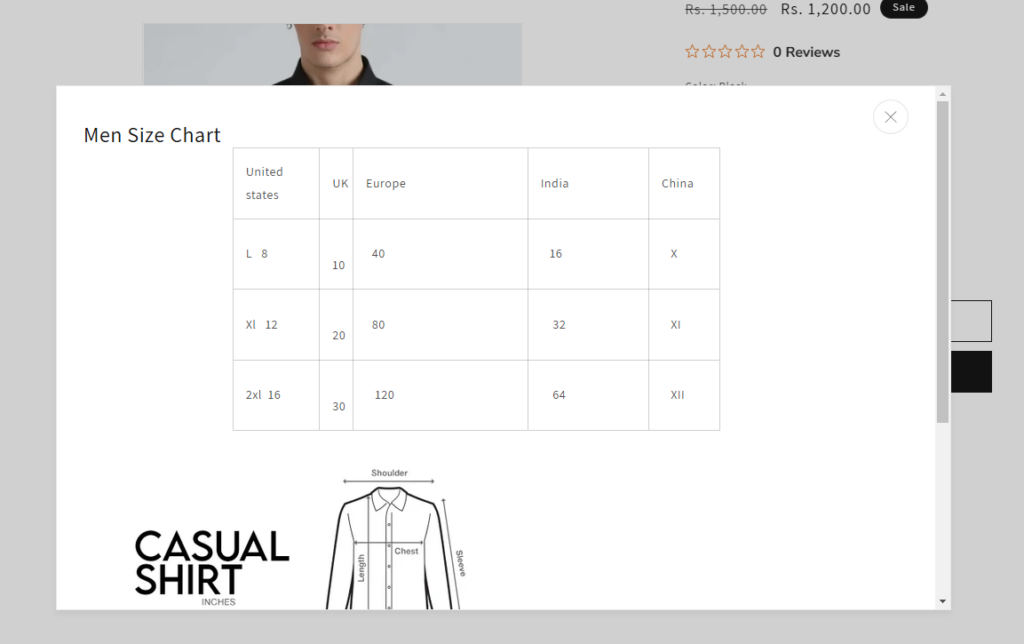
Step 5: We created size chart MetaField type is page in my case . As per your requirment choose your type you can use that data.
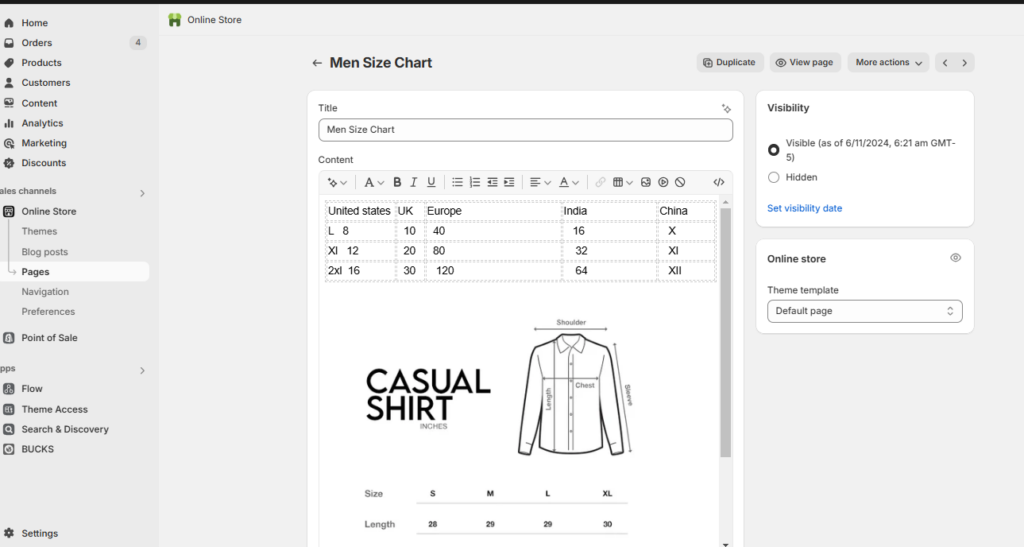
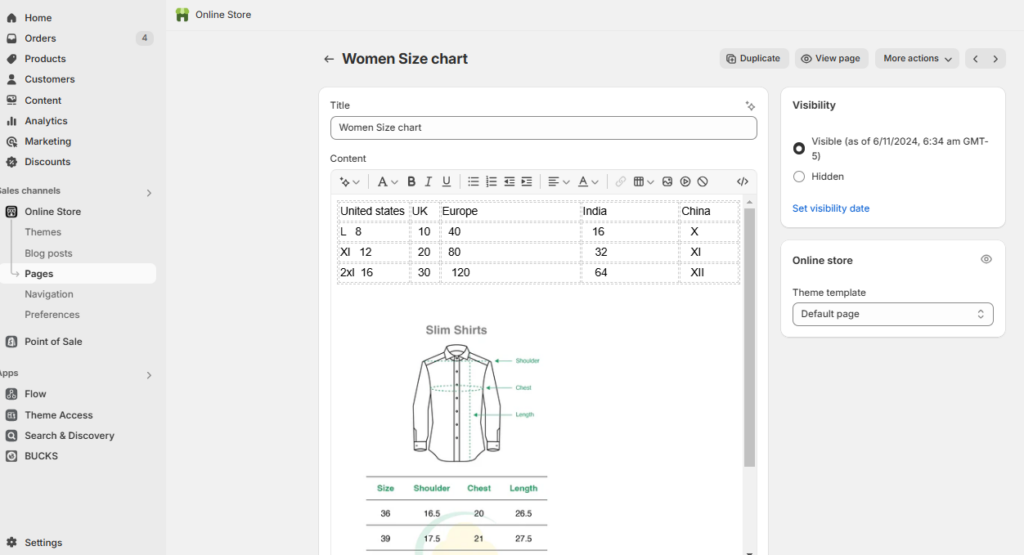
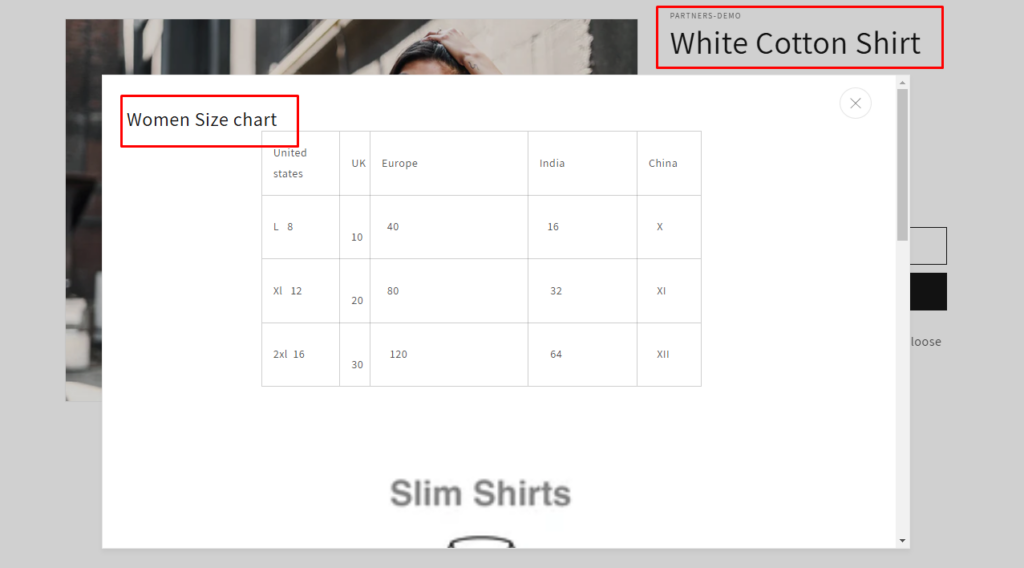
Step 6: Now create two pages of Men and Women clothes size chart like below.
Men shirt size chart page:
Women shirt size chart page:
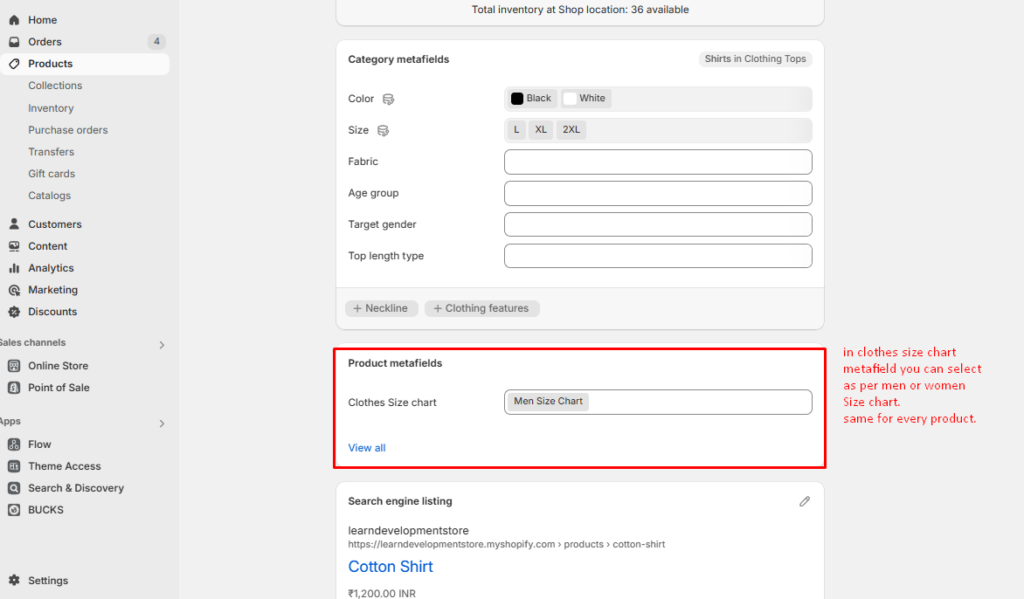
After creating the Metafield, go to the “Men’s Shirt” Product where you want to use it. There, you will find the new Metafield you created.
Step 7: Now open the product page in Shopify admin where you can see new metafield we created.
Step 8: Go to theme customize and product page.
Add new block after Add to cart Button Block. Popup block follow screenshot below
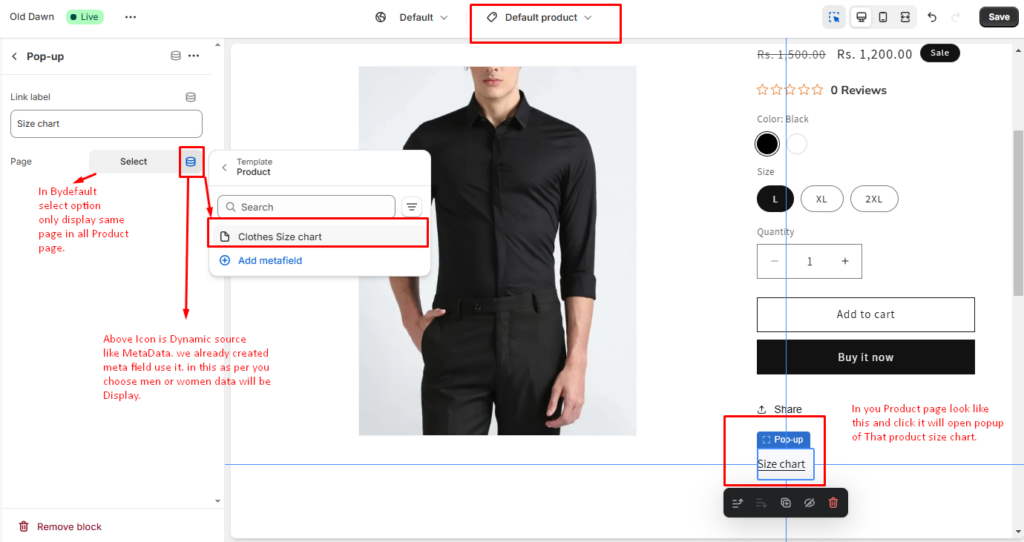
All completed, now you can see screenshot below:
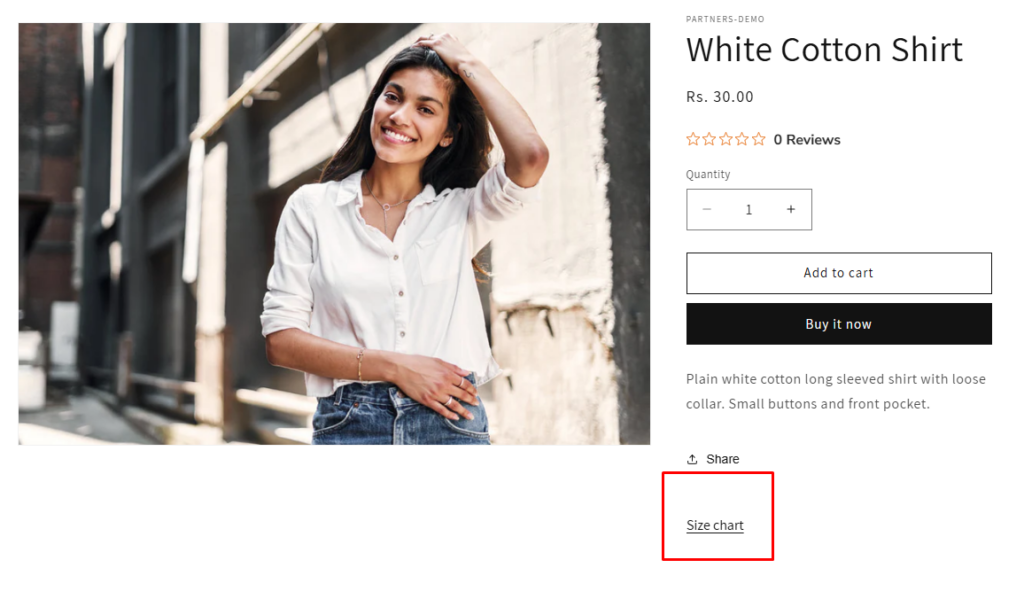
Select women’s clothing from the same collection as the girl’s products.
How to Create and Use Metaobjects in Shopify
1. Define a Metaobject
- In Shopify Admin, navigate to Settings > Custom Data > Metaobjects.
- Create a new metaobject definition (e.g., “Care Instructions”).
- Add fields (e.g., Text for washing instructions, Image for icons).
2. Populate Metaobjects
- Go to Content > Metaobjects in the Shopify admin.
- Create entries for the defined metaobject (e.g., specific care instructions for cotton products).
3. Use Metaobjects in Products
- Link the metaobject to a product or collection using metafields.
- Access metaobject data via Liquid:
Liquid code:
{% for instruction in product.metafields.care_instructions.value %}
  <p>{{ instruction.text }}</p>
{% endfor %}
Advanced Use Cases
- Dynamic Product Pages with Metaobjects: Create a metaobject for “Product Highlights” with fields like icons, descriptions, and links. Use it to display uniform information for products of the same type.
- Customizable Landing Pages: Build landing pages using metaobjects that define banners, calls to action, and testimonials, providing a consistent layout across campaigns.
- Improved SEO with Structured Data: Use metafields to store JSON-LD data for schema markup and improve search engine visibility.
How to Create Metaobjects (7 Steps)
Here are simple 7 steps to create Shopify metaobject
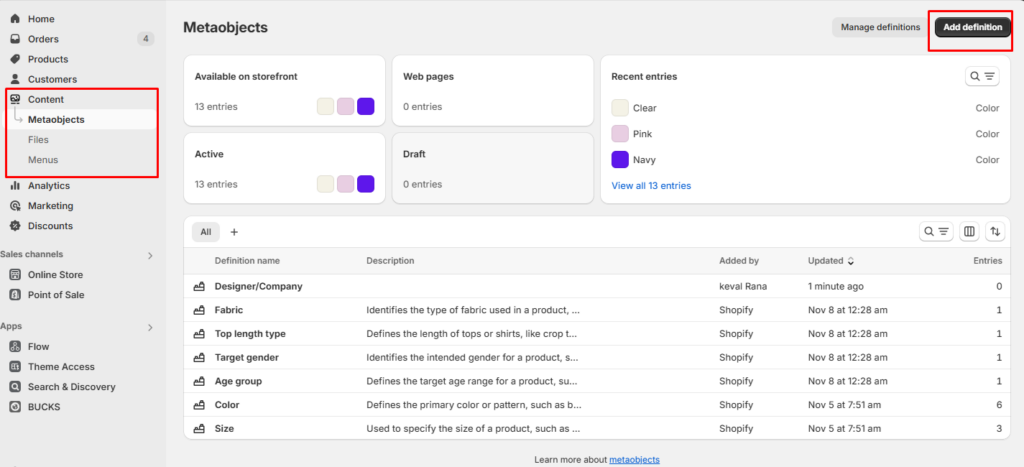
1. Accessing the Metaobjects Section
- Log into your Shopify Admin Dashboard: Start by signing in to your Shopify account.
- Navigate to Settings: On the left sidebar, click on Settings.
- Select Custom Data: Scroll down and select Custom Data, where you will find the section for metaobjects.
2. Creating a Metaobject Definition
- Click on Metaobjects: In the Custom Data section, click on Metaobjects.
- Add Definition: Click on Add Definition to create a new metaobject.
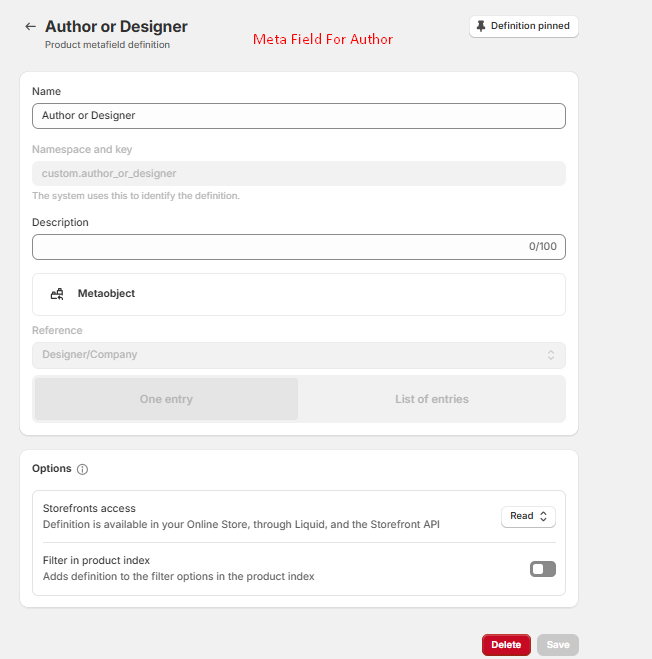
- Enter Details:
- Name: Provide a relevant name for your metaobject (e.g., “Designer” or “Company”).
- Description: Optionally, add a description to clarify the purpose of the metaobject.
- Define Fields: Add fields that will be included in your metaobject. Choose field types based on your requirements, such as:
- Text (Single line)
- Rich Text
- Image (File upload)
- URL
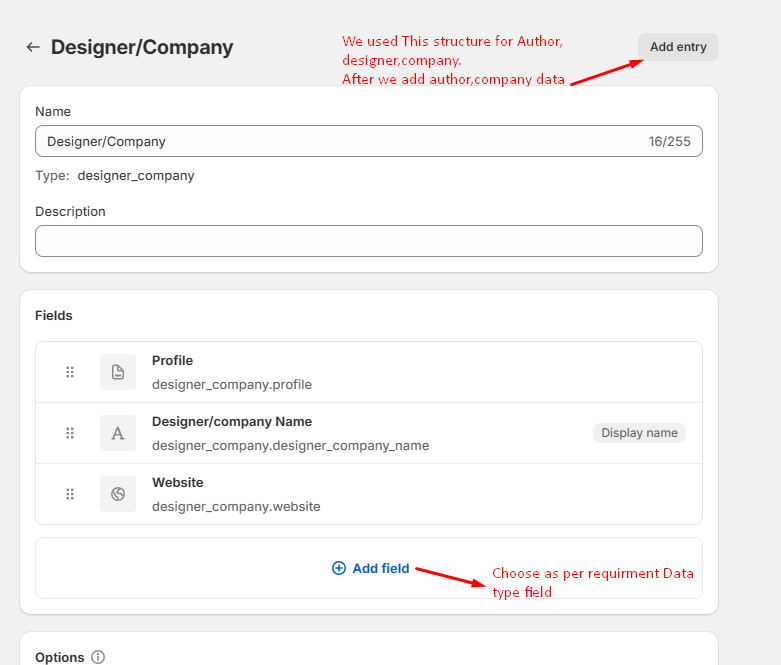
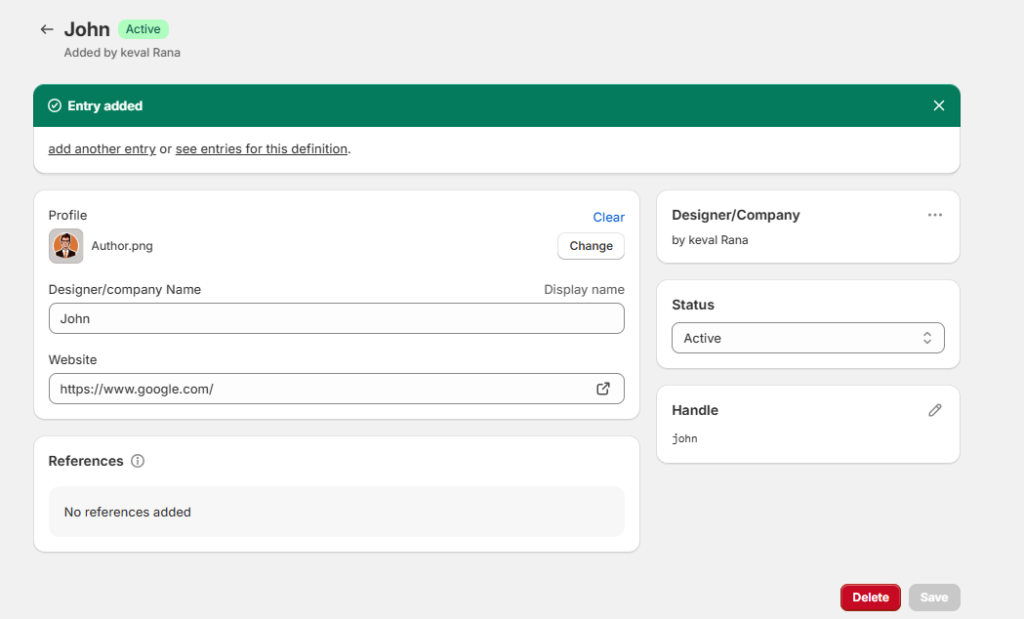
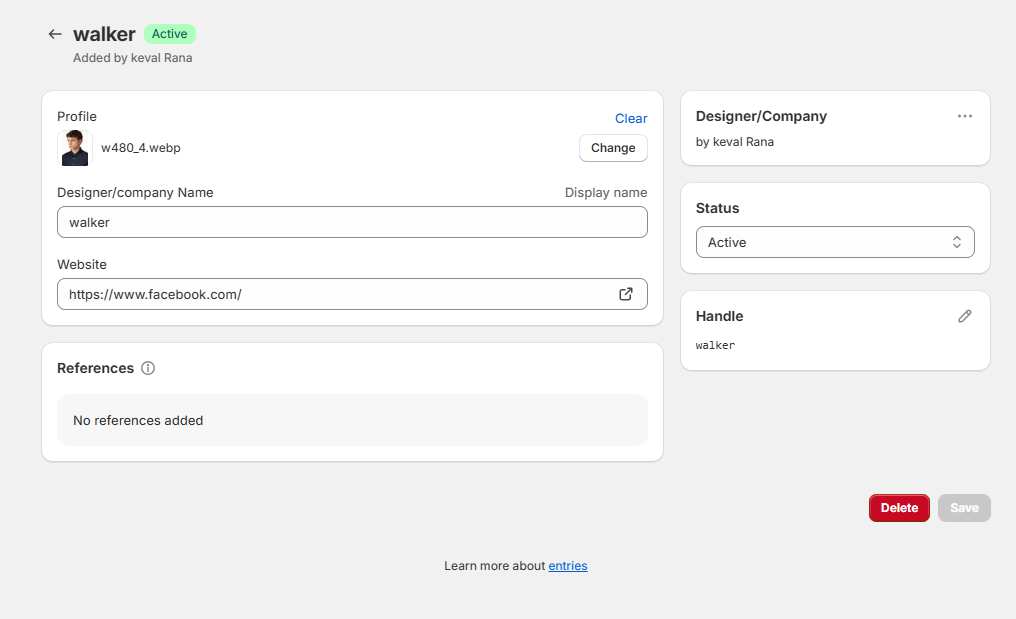
3. Adding Entries to Your Metaobject
- Save the Definition: After defining your fields, save the metaobject definition.
- Add Entry: Click on Add Entry at the top right of the screen.
- Fill Out Fields: You will see all the fields you defined earlier. Enter the relevant data for each field.
4. Creating a Metafield for Products
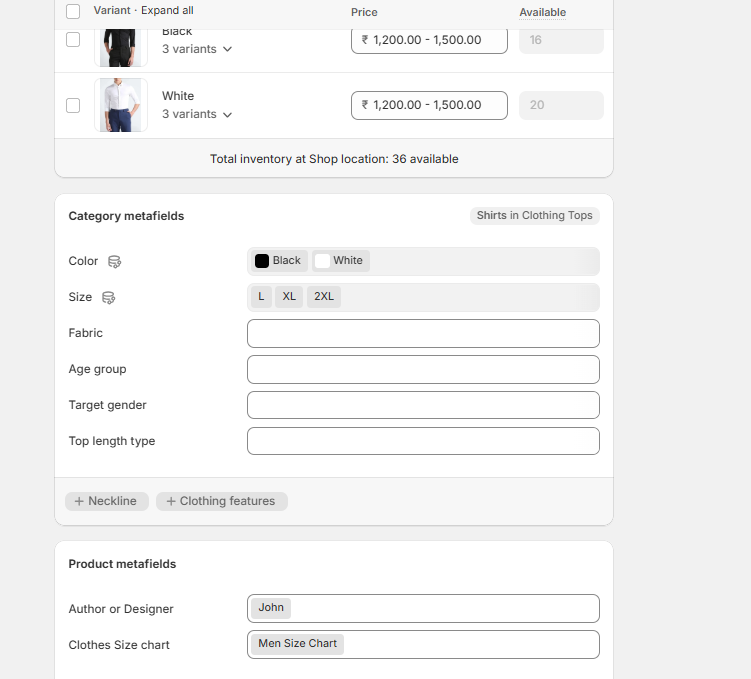
- Navigate to Products Section: Go back to your Shopify dashboard and select Products from the left sidebar.
- Select a Product: Click on the product you want to associate with your new metaobject.
- Add Metafield Definition:
- In the Product Metafields section, click on Add Definition.
- Name your metafield (e.g., “Author” or “Designer”) and choose the type as Metaobject.
- Select the corresponding metaobject you created earlier and save.
5. Linking Metaobjects to Products
- Return to Product Page: Go back to the product page where you added the metafield.
- Select Entry: Click on the metafield (e.g., “Author”) and select the relevant entry from your metaobject.
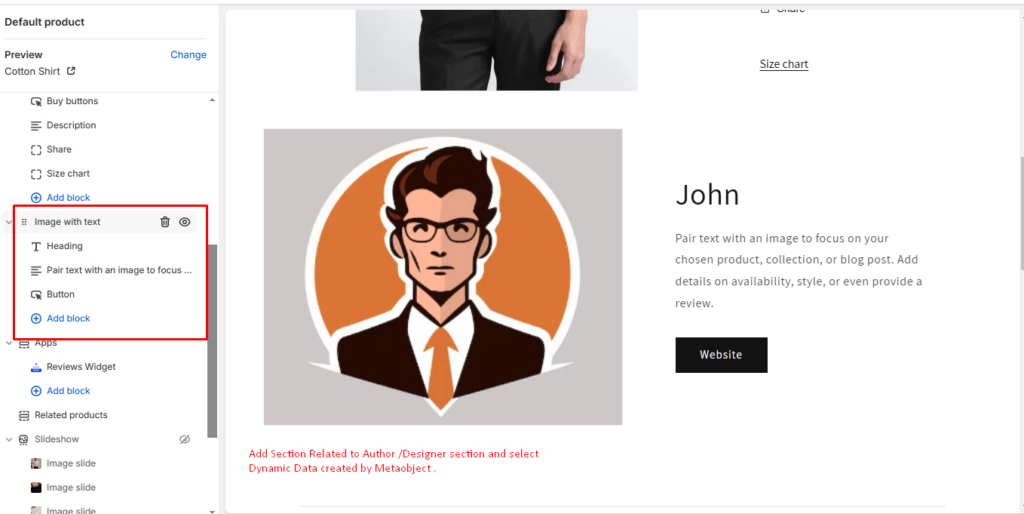
6. Customizing Your Theme
- Go to Customize Theme: From your Shopify dashboard, navigate to Online Store > Themes, then click on Customize next to your active theme.
- Edit Product Page Layout: Select the product page layout where you want to display your metaobject data.
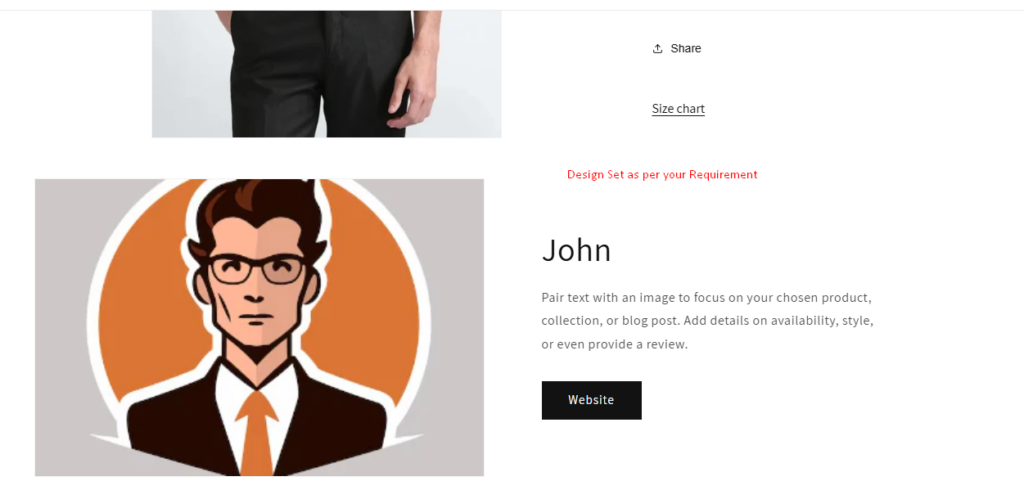
- Add Image with Text Block:
- Choose an appropriate block (e.g., Image with Text).
In this block, select dynamic content using the Metafield you created.
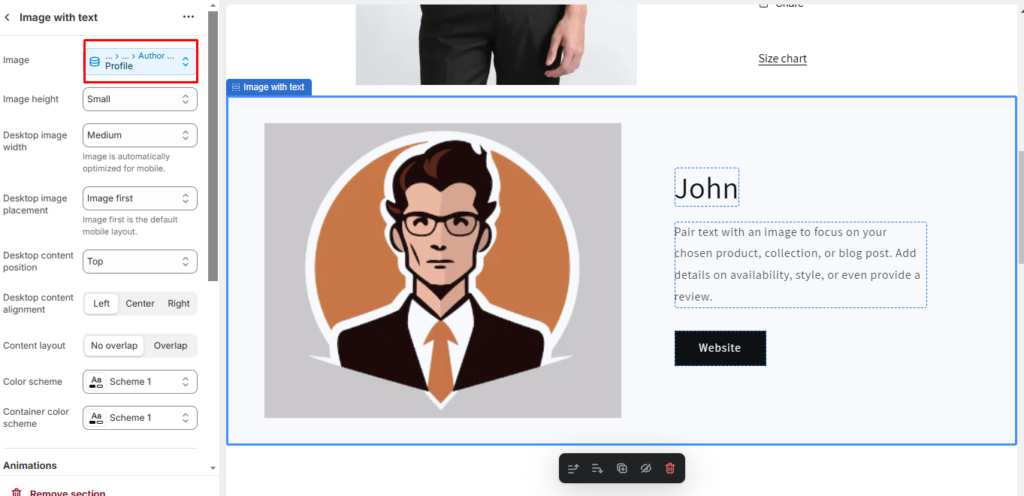
7. Finalizing Display Settings
- Configure Dynamic Options: Click on the image or heading in your block and choose dynamic options that reference your metafield and associated metaobject.
- Save Changes: Ensure all changes are saved before exiting the theme editor.
By following these steps, you will successfully create and implement metaobjects in your Shopify store, allowing for more organized and dynamic content management across product pages.
Conclusion
Shopify Metafields and Metaobjects unlock endless possibilities for customizing your store. Whether you’re a store owner looking to personalize product pages or a developer creating advanced features, these tools empower you to craft memorable shopping experiences tailored to your audience. By understanding and utilizing their full potential, you can take your Shopify store to the next level and stand out in the competitive e-commerce landscape.
If you have any questions or need technical assistance, our experienced Shopify developers are ready to help you with everything from setup and customization to advanced feature development. Whether you need help resolving technical challenges or optimizing your store for peak performance, we’re here to support your success at every step.
I'm currently a WordPress & Shopify developer at Samarpan Infotech, I'm passionate about web development. Beyond coding, I have a curious mind for world affairs and geopolitics, while also enjoying the occasional chess match in my spare time.