How to Create a Dynamic Slider Using ACF Repeater Field and Slick
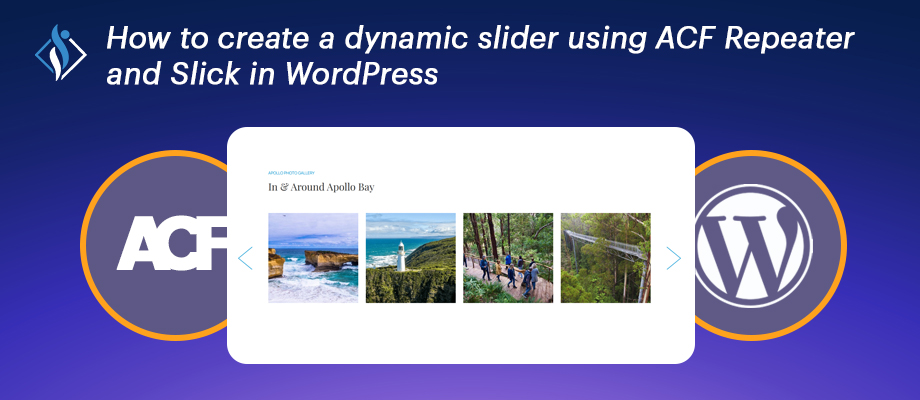

Creating dynamic sliders on your WordPress site can greatly enhance user engagement and visual appeal. By combining the Advanced Custom Fields (ACF) Repeater functionality with the Slick Slider library, you can build a customizable and visually stunning slider that is easy to manage from the WordPress admin panel. In this article, we’ll explore how to create a dynamic slider using the ACF Repeater field and the Slick slider library.
Prerequisites:
- Advanced Custom Fields (ACF) Pro Plugin
- Slick Slider
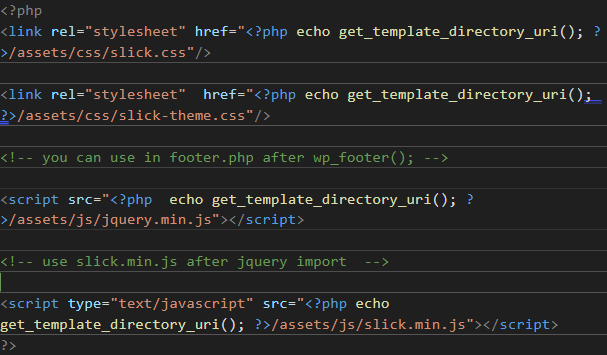
You can download Slick from its official site: Slick Slider. If you choose to download it, place the slick.css, slick-theme.css, and slick.min.js files in your project’s assets folder.
Replace “path-to-your-assets” with the actual path to your assets folder where the Slick files are located. This will ensure Slick’s styles and JavaScript are properly loaded into your project.
To use Slick’s functionality, add the following code inside the tag of your header.php file:
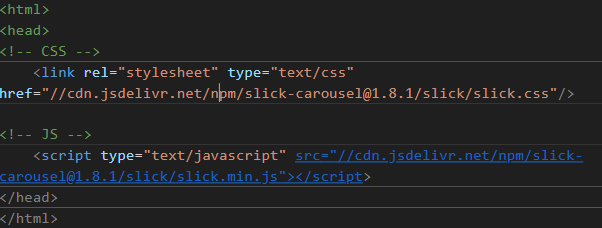
If you don’t want to download Slick, you can use it directly with the jsDelivr CDN links. Just add the following code inside the tag of your header.php to include Slick via CDN:
After including Slick’s CSS and JS in header.php, you can now use ACF to create dynamic sliders using the Repeater field.
5 Steps to Create a Dynamic Slider Using ACF Repeater field and Slick
Lets go through 5 easy steps by steps to build dynamic slider using the ACF Repeater field and Slick in WordPress.
1. Create a Field Group
First, create a field group in ACF. For example, if you want to display the slider on the homepage, name the field group “Homepage” (or something similar).
Set the location rules to where you want the content to appear. For instance, in this case: Page Template -> is equal to -> Homepage.
2. Add a Repeater Field
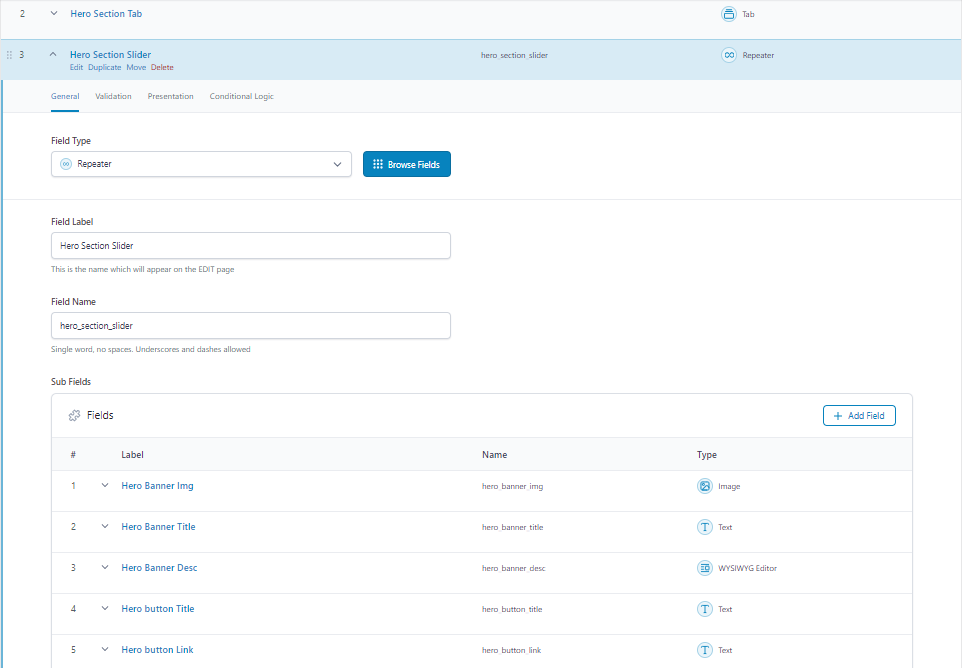
Next, add a Repeater Field for multiple slide contents within this field group. This will allow you to add and manage the content for each slide dynamically. Add subfields inside the repeater, such as:
- Slide Image: Image field for the slide’s visual content.
- Slide Title: Text field for the title of each slide.
- Slide Description: Text area or WYSIWYG editor for additional information.
- Button Title: Text field for any call-to-action buttons.
- Button URL: Text field for linking purposes.
Once done, it should look like screenshot below:
After creating the field group and the repeater field in ACF, you need to assign this field group to your homepage. Here’s how to do it:
3. Assign the Field Group
Once you’ve created the fields, navigate to the page where you want to display the slider (in my case, the homepage). The ACF fields should now be displayed in the WordPress editor for that page.
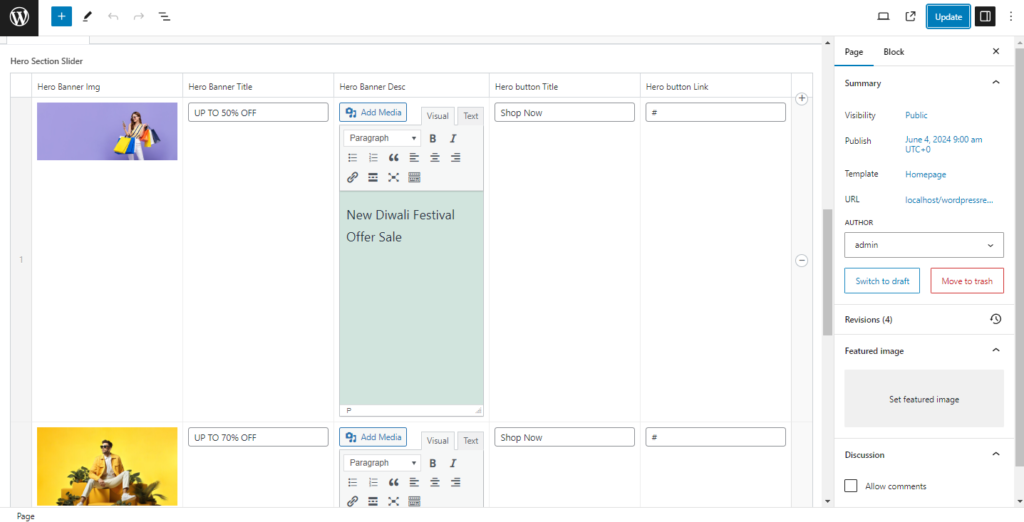
4. Fill in the Data
Go to the homepage in the WordPress admin panel. You should see the ACF Repeater fields you created. Fill in the data for each slide, including the slide image, title, description, and any other relevant fields you added.
5. Save the Page
After filling in the data for the slides, make sure to save or update the page to retain the information you entered. You can see in screenshot below:
After filling in the data, go to the template.php file (in my case, homepage.php) and put the code below in that file. Please ensure you use your ACF Repeater name and the names of the Repeater ACF fields.
<div class="banner-main-slider">
   <!--  //  your css slider class used in my banner-main-slider  -->
    <?php
    if (have_rows('hero_section_slider')) {  // Repeater Name used in Acf
        while (have_rows('hero_section_slider')) // Repeater Name used in Acf
        {
            the_row();
            $hero_banner_img = get_sub_field('hero_banner_img');  // Acf Repeater Field
            $hero_banner_title = get_sub_field('hero_banner_title');
            $hero_banner_desc = get_sub_field('hero_banner_desc');
            $hero_button_title = get_sub_field('hero_button_title');
            $hero_button_link = get_sub_field('hero_button_link');
    ?>
            <div class="slider-content" style="background-image: url('<?php echo $hero_banner_img; ?>'); ">
                    <h2><?php echo $hero_banner_title; ?></h2>
                    <p><?php echo $hero_banner_desc; ?></p>
                    <a href="<?php echo $hero_button_link; ?>"><?php echo $hero_button_title; ?></a>
             </div>
    <?php
        }
    }
    ?>
</div>
<!-- your other content -->
<?php
get_footer();
?>
<script type="text/javascript">
    $(document).ready(function() {
       $('.banner-main-slider').slick({ // used this class for slide in above

            dots: true,
            infinite: true,
            autoplay: true,
            speed: 3000,
            slidesToShow: 1,
            slidesToScroll: 1,
            responsive: [{
                    breakpoint: 1024,
                    settings: {
                        slidesToShow: 1,
                        slidesToScroll: 3,
                        infinite: true,
                        dots: true
                    }
                },
                {
                    breakpoint: 600,
                    settings: {
                        slidesToShow: 2,
                        slidesToScroll: 2
                    }
                },
                {
                    breakpoint: 480,
                    settings: {
                        slidesToShow: 1,
                        slidesToScroll: 1
                    }
                }
            ]
        });
    });
</script>
After this process slider look like below screenshot (You can adjust CSS as per your requirement):


Note: Some Slick Slider features used as per your requirement like speed, SlidesToShow, SlidesToScroll, autoplay, arrow, dots.
Conclusion
By following the steps outlined above, you can create a dynamic slider for your WordPress site that is both visually appealing and easy to manage. This not only enhances the functionality of your site but also improves the user experience, keeping visitors engaged with your content.
If you are facing any issues or need further assistance, don’t hesitate to reach out. Our experienced WordPress developers are here to assist you every step of the way, ensuring that your content layouts are customized to meet your specific needs. Contact us today to get started.
I'm currently a WordPress & Shopify developer at Samarpan Infotech, I'm passionate about web development. Beyond coding, I have a curious mind for world affairs and geopolitics, while also enjoying the occasional chess match in my spare time.