How to Create an Author Bio and Page in WordPress Custom Post Types

In this article, we’ll explore how to create an author bio section and author page for a custom post type in WordPress without using a plugin.
Prerequisites:
- Advance Custom Field (ACF) Free Plugin
What is an Author Bio?
An author bio is a brief description of the author of a blog post, typically including their name, a short summary of their background or expertise, and sometimes a link to their personal website or social media profiles.
This section is crucial in establishing credibility and building a connection with readers. It provides valuable context about the author’s perspective and expertise, making the content more relatable and trustworthy. Here are the main points:
- Purpose:
- It’s not just a name. It’s a way to connect with readers, build trust, and make them want to read more of your work.
- What to Include:
- Name: Start with your name.
- Achievements: Mention any important things you’ve done.
- Encourage Readers: Tell readers to check out your work.
- Why It’s Important:
- A strong author bio can attract more Client, Users and Collaborators.
- Even if people don’t know you, a strong bio can make them interested in your story.
Author Bio section benefits
- Personalization: Including an author box can help readers connect with the writer and feel a more personal connection with the content.
- Credibility: An author box can lend credibility to the post by identifying the author and their credentials.
- Promotion: The author box can also serve as a promotion tool for the author’s other works or projects.
- Transparency: In some cases, it may be required to provide information about the author for legal or ethical reasons.
Author Bio section on default posts
If you’d like to use an Author Bio section on your default posts, you can use the following free plugin:
- Simple Author Box
How to create an Author Bio in WordPress custom post types
Let’s start creating an Author Bio section for a custom post type for free and without using a plugin.
Step 1: Install Advanced Custom Fields (ACF) Plugin
Step 2: Create an ACF Field Group for the Author Bio section as shown in the screenshot below.
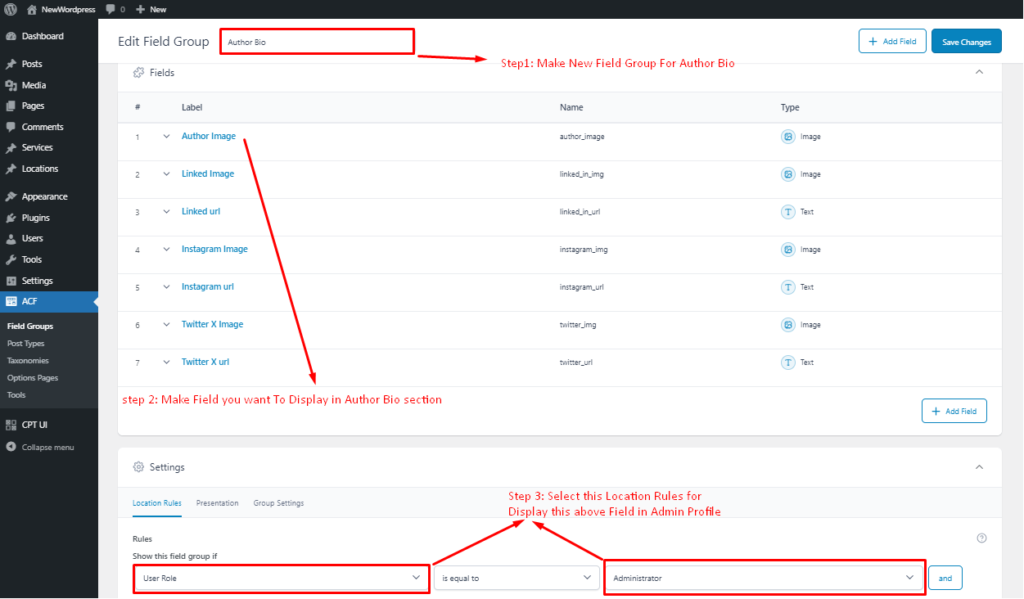
Step 3: After creating the ACF for the Author Bio section as described above, the Author Bio section will be displayed in the admin user profile.
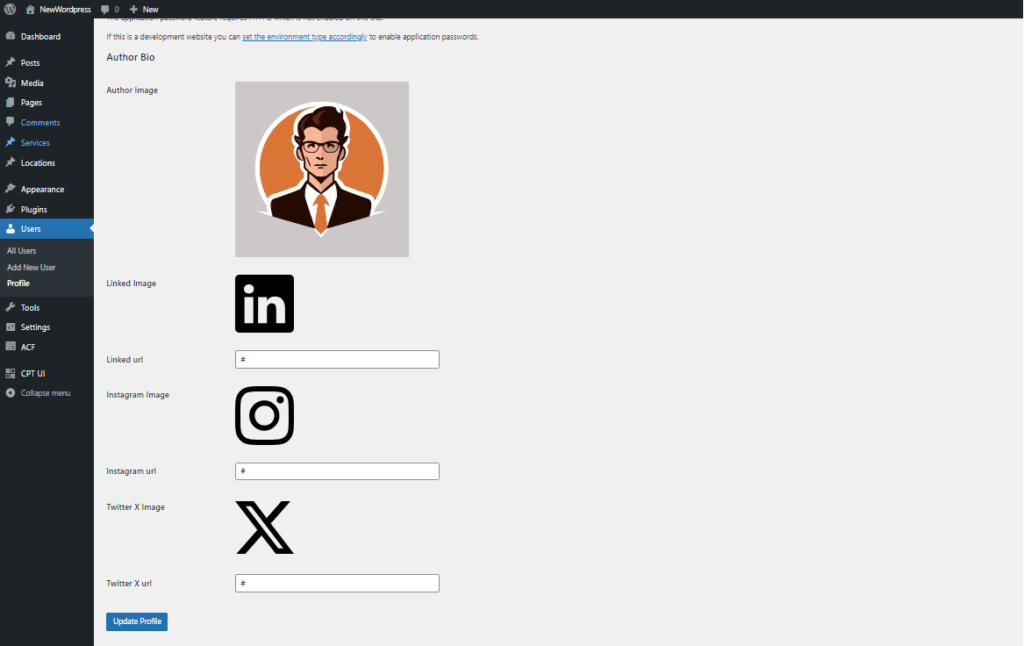
Step 4: In the admin user profile, add the name and biographical info as the description used in the Author Bio section.
Step 5: After completing the above steps, open the single-custom-post-type.php file where you want to add the Author Bio section. Insert the following code snippet as shown in the image below:
<div class="bio-section">

    <?php

    $post_id = get_the_ID();

    $author_id = get_the_author_meta('ID');

    // Author Detail

    $author_name = get_the_author_meta('display_name', $author_id);

    $author_description = get_the_author_meta('description', $author_id);

    $post_published_date = get_the_date('F j, Y', $post_id);

    // Author Image

    $avatar_image = get_field('author_image', 'user_'. $author_id );

    $linkedin = get_field('linked_in_img', 'user_'. $author_id );

    $instagram = get_field('instagram_img', 'user_'. $author_id );

    $twitter = get_field('twitter_img', 'user_'. $author_id );

    // Author Social icon Url

    $linkedin_url = get_field('linked_in_url', 'user_'. $author_id );

    $instagram_url = get_field('instagram_url', 'user_'. $author_id );

    $twitter_url = get_field('twitter_url', 'user_'. $author_id );

    ?>

    <div class="author-bio author-bio-sec">

        <div class="author-sub-sec">

            <div class="author-profile-sec">

                <?php if(!empty($avatar_image)) { ?>

                    <img src="<?php echo $avatar_image; ?>" alt="<?php echo $author_name; ?>">

                <?php } ?>

            </div>

            <div class="author-content-sec">

                <a href="<?php echo get_author_posts_url($author_id);?>"><h2><?php echo $author_name; ?></h2></a>

                <p><?php echo $author_description; ?></p>

                <p><?php echo 'Published Date:'.$post_published_date; ?></p>

                <div class="social-icon-sec">

                    <?php

                    if (!empty($linkedin_url) && !empty($linkedin)) {

                        echo '<a href="' . esc_url($linkedin_url) . '"><img src="' . esc_url($linkedin) . '" alt="Linked-In Avatar"></a>';

                    }

                    if (!empty($instagram_url) && !empty($instagram)) {

                        echo '<a href="' . esc_url($instagram_url) . '"><img src="' . esc_url($instagram) . '" alt="Instagram Avatar"></a>';

                    }

                    if (!empty($twitter_url) && !empty($twitter)) {

                        echo '<a href="' . esc_url($twitter_url) . '"><img src="' . esc_url($twitter) . '" alt="Twitter Avatar"></a>';

                    }

                    ?>

                </div>

            </div>

        </div>

    </div>

</div>
The output of this snippet will look like the image attached below:

Step 6: The next step is to make sure that when a user clicks on the author’s name in the admin, it will open the author’s page and display all the posts related to that author.
Let’s take the default author hierarchy:
- author-{nicename}.php
- author-{id}.php
- author.php (Preferred)
After creating the author.php file, insert the following code:
<?php

get_header();

// Set the Current Author Variable $curauth

$curauth = (isset($_GET['author_name'])) ? get_user_by('slug', $author_name) : get_userdata(intval($author));

$post_id = get_the_ID();

$author_id = get_the_author_meta('ID');

// Author Detail

$author_name = get_the_author_meta('display_name', $author_id);

$author_description = get_the_author_meta('description', $author_id);

$post_published_date = get_the_date('F j, Y', $post_id);

// Author Images

$avatar_image = get_field('author_image', 'user_'. $author_id );

$linkedin = get_field('linked_in_img', 'user_'. $author_id );

$instagram = get_field('instagram_img', 'user_'. $author_id );

$twitter = get_field('twitter_img', 'user_'. $author_id );

// Author Social icon Url

$linkedin_url = get_field('linked_in_url', 'user_'. $author_id );

$instagram_url = get_field('instagram_url', 'user_'. $author_id );

$twitter_url = get_field('twitter_url', 'user_'. $author_id );

?>

<div class="author-bio author-bio-sec">

    <div class="author-sub-sec">

        <div class="author-profile-sec">

            <?php if(!empty($avatar_image)): ?>

                <img src="<?php echo $avatar_image; ?>" alt="<?php echo 				$author_name; ?>">

            <?php endif; ?>

        </div>

        <div class="author-content-sec">

            <a href="<?php echo get_author_posts_url($author_id);?>">

                <h2><?php echo $author_name; ?></h2>

            </a>

            <p><?php echo $author_description; ?></p>

            <p><?php echo 'Published 						 			Date:'.$post_published_date; ?></p>

            <div class="social-icon-sec">

                <?php

                if (!empty($linkedin_url) && !empty($linkedin)) {

                    echo '<a href="' . esc_url($linkedin_url) . '"><img 			src="' . esc_url($linkedin) . '" alt="Linked-In 				Avatar"></a>';

                }

                if (!empty($instagram_url) && !empty($instagram)) {

                    echo '<a href="' . esc_url($instagram_url) . 					'"><img src="' . esc_url($instagram) . '" 					alt="Instagram Avatar"></a>';

                }

                if (!empty($twitter_url) && !empty($twitter)) {

                    echo '<a href="' . esc_url($twitter_url) . '"><img 			src="' . esc_url($twitter) . '" alt="Twitter 				Avatar"></a>';

                }

                ?>

            </div>

        </div>

    </div>

</div>

<?php

$args = array(

    'author'         => $curauth->ID,

    'post_type'      => 'service', // Change to your custom post type slug

    'post_status'    => 'publish',

    'posts_per_page' => -1

);

$query = new WP_Query($args);

// Display posts by the author

if ($query->have_posts()) :

    while ($query->have_posts()) : $query->the_post(); ?>

        <div class="content-section">

            <div class="content-img">

                <img src="<?php echo get_the_post_thumbnail_url($query-			>ID); ?>" alt="">

            </div>

            <h3>

                <a href="<?php the_permalink(); ?>" rel="bookmark" 				title="Permanent Link: <?php the_title(); ?>">

                    <?php the_title(); ?>

                </a>

            </h3>

            <p class="posted-on">Posted on: <?php the_time('d M 				Y'); ?></p>

            <?php the_excerpt(); ?>

        </div>

<?php endwhile;

    // Previous/next page navigation.

    the_posts_pagination();

else : ?>

    <p><?php _e('No posts by this author.'); ?></p>

<?php endif;

wp_reset_postdata();

?>

<?php get_footer();?>
The output of this snippet will look like the image attached below:

So, in the above tutorial, we learned how to implement an Author Bio section on Custom Post Type posts and create an Author Page without using a plugin.
Conclusion
Creating an author bio and author page in WordPress custom post types can be a powerful way to establish credibility, build connections with readers. While there are free plugins available that can help you add an author bio to your default posts, using custom post types offers more flexibility and control over the design and layout of your author bio section.
If you’re looking for a professional and customized solution, our WordPress developer is ready to help you create a unique author bio and author page that reflects your brand and enhances your blog’s overall user experience.
I am working as a WordPress & Squarespace Developer at Samarpan Infotech, My expertise encompasses a wide range of skills, theme customization, plugin integration, API Integration. I strongly believe in the motto, "Success is not the key to happiness, happiness is the key to success; if you love what you are doing, you will be successful.